So a while back I posted about Scott Slater's technique of mounting puzzles
here. We have had pretty great success but also some serious fails. We have adopted very successfully the technique of using contact paper instead of glue. When you glue a puzzle, it tends to dry unevenly also, in hot areas, it tends to never really dry well. We found out the hardway puzzles we glued in Michigan were stuck to each other when we mailed them down here to us. I recommend the contact paper, this lets the pieces stay together very flat and gives a very uniform look. (this is both good and bad, to be honest, some of the glued puzzles look more like "puzzles" with their uneven glued surface, we may still use glue from time to time)
Where we ventrued off the path a bit was gluing the puzzle to 1inch insulation foam versus foam board. We then paint the side of the form giving it a very nice look for a reasonable price (versus framing each one which we might do when we stop spending money on puzzles).
Specifically, first we rough cut the foam board to fit the puzzle, apply glue (3M Super 77 spray adhesive) to the board and puzzle as Scott shows, then press the puzzle down and use a very sharp razor knife to cut the foam board to fit exactly. Next we use a #8 nylon dry wall anchor (cut off so that it is less than an inch long) to mount a string to the foam so it can be hung. If we were to just use a screw, it would pull out of the foam. Finally we choose a color to accent the puzzle and paint the boarder.
All is not perfect in puzzle land. It turns out that the glue needs to be applied better than I did on some of the puzzles as some of the puzzles have come off the foam board and need to be re-glued.
Overall though, we are very happy with this technique.
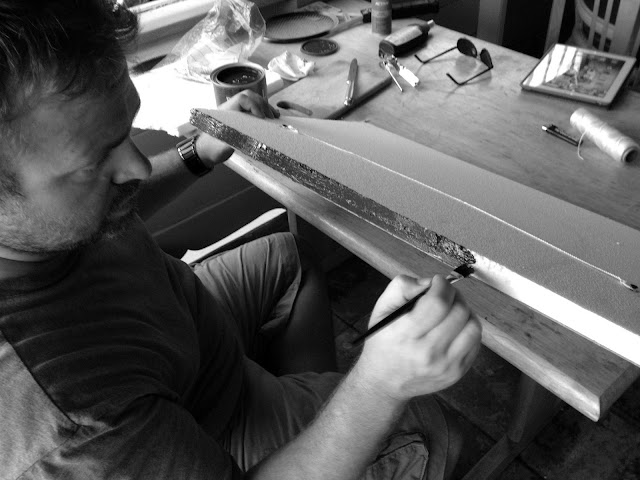 |
| Painting the edge of the foam of the puzzle cocktails. You can see the mounting string applied to the foam. |
 |
| Close up of the mounting anchors. We us a knife to cut them about 3/4inch long. We use the screwdriver to start the whole and remove a bit of the foam. Just cut the anchor and start screwing it in. Obviously, make sure you dont screw it through the front of the puzzle :-) |
 |
| The finished product! San Francisco has a much better 3d look on the wall versus a flat puzzle. |
 |
| More finished product. Here you can see Beach Hammocks, Cocktails, and Jellies complete. We still need to paint Shoes in the lower left. Painting an accent color makes all the difference. |
 |
| This is what happens if you dont apply enough glue... Also, you must be careful when applying the glue to the foam, if you get the spray can to close to the glue, the solvent in the glue will melt the foam. Oh yeah, dont try and use contact glue, the solvent just eats away the foam.... (lesson learned the hard way) |


Wow...that's a lot of puzzles that you've finished and mounted. Do you guys keep and mount all your puzzles? You're going to run out wall space soon with all the ones you have planned to finish. Just the Double Retrospect and the Life puzzle by themselves will take up most wall space you might have.
ReplyDeleteI can't imagine the foam pieces being sturdy enough long term for the puzzles (or at least not one as big and heavy as Life).
Penny